 Field Mapping
 Field Mapping is when a standard or custom field in Salesforce is mapped to be able to be used in a Measure or Group By field. Measure
is a calculated numeric field, like opportunity count or total opportunity amount. Group By is the filed you want the number to group
together, like seeing the total opportunity amount by opportunity stage. Opportunity stage is a group by field. See step by step
instructions below to map a field to a Measure or Group By field.
How to Field Map?
What Is Field Mapping?
Go to the Setup tab, then select Field Mapping.
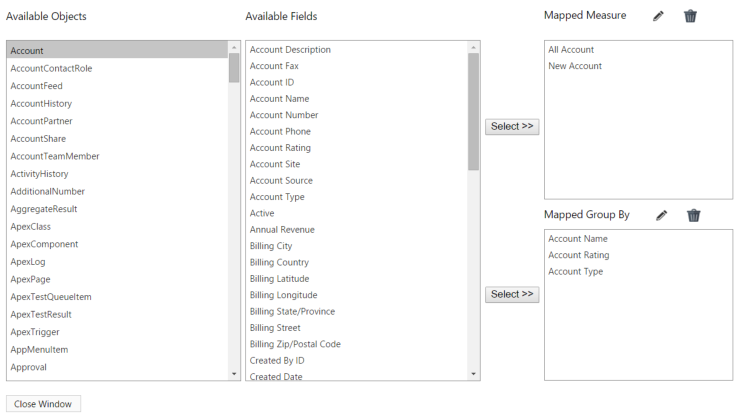
Once the Field Mapping window has loaded it will appear like this:
Field Mapping is when a standard or custom field in Salesforce is mapped to be able to be used in a Measure or Group By field. Measure
is a calculated numeric field, like opportunity count or total opportunity amount. Group By is the filed you want the number to group
together, like seeing the total opportunity amount by opportunity stage. Opportunity stage is a group by field. See step by step
instructions below to map a field to a Measure or Group By field.
How to Field Map?
What Is Field Mapping?
Go to the Setup tab, then select Field Mapping.
Once the Field Mapping window has loaded it will appear like this:
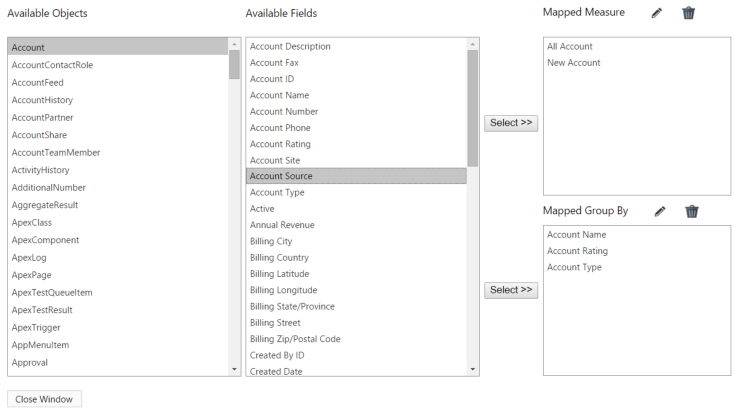
 To map a field, first select an object to map fields to.
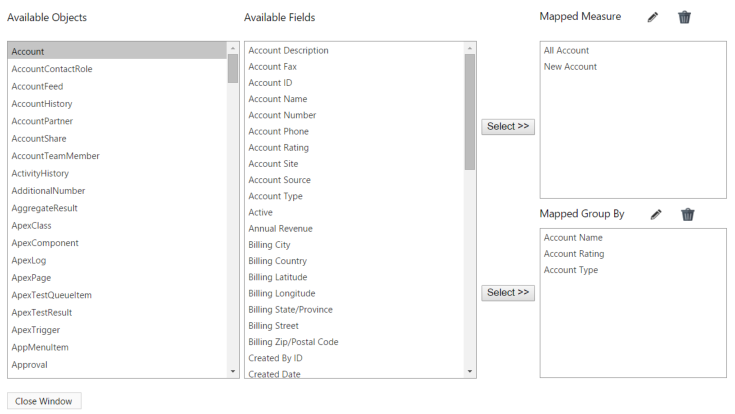 Once an object is selected, the fields available for mapping will appear. To map one of these fields, select the field, then hit the Select
button pointing to the Measure or a Group By column.
When the field is mapped to the Group By or Measure field, another window will appear where you can customize your field. To field
map a Measure, follow the same steps as above, but select Mapped Measure instead of Mapped Group By.
A Measure have many options to choose from for both displaying and calculation purposes. that affect how your Measure will be
configured. You can choose how the measure will be calculated, the format it will be displayed in, how many decimals to show, and
whether an increase in numbers means a positive change. You can also add custom filters and customize the Measure Label.
To edit or delete any mapped Measures or Group By fields, simply select the item and then the Pencil Icon to edit, or the Trash Icon
to delete at any time.
Notice that the picture above includes custom objects under the Available Objects column. Custom objects are automatically
populated into this column without having to do any back end work. Simply select a custom object and the Available Fields column
will populate with the fields associated to that object. The field mapping process remains the same for standard and custom objects.
Once an object is selected, the fields available for mapping will appear. To map one of these fields, select the field, then hit the Select
button pointing to the Measure or a Group By column.
When the field is mapped to the Group By or Measure field, another window will appear where you can customize your field. To field
map a Measure, follow the same steps as above, but select Mapped Measure instead of Mapped Group By.
A Measure have many options to choose from for both displaying and calculation purposes. that affect how your Measure will be
configured. You can choose how the measure will be calculated, the format it will be displayed in, how many decimals to show, and
whether an increase in numbers means a positive change. You can also add custom filters and customize the Measure Label.
To edit or delete any mapped Measures or Group By fields, simply select the item and then the Pencil Icon to edit, or the Trash Icon
to delete at any time.
Notice that the picture above includes custom objects under the Available Objects column. Custom objects are automatically
populated into this column without having to do any back end work. Simply select a custom object and the Available Fields column
will populate with the fields associated to that object. The field mapping process remains the same for standard and custom objects.


 1.
The name for this specific Group By field.
2.
The source object of the source field.
3.
The source field to group by on.
4.
Remote Group By is used when a Group By field is in another source object and needs to join this group by field to it. Remote Object is the
source object this Group By field will join to.
5.
Remote Join Field is the field on the remote object for this Group By to join data to.
6.
Remote Display Field is the field used for value displaying after data join between this Group By and Remote Field.
7.
Extra field(s) to display before this Group By field. It’s a simple lookup from Group By field to the source object for these extra field(s). If the
Group By field has multiple values from a lookup field, the first value will be selected. Report Upgrade Administrator needs to be aware of
the implication of using lookup field(s) instead of sub group by.
8.
Extra field(s) to display after this Group By field. It’s a simple lookup from Group By field to the source object for these extra field(s). If the
Group By field has multiple values from a lookup field, the first value will be selected. Report Upgrade Administrator needs to be aware of
the implication of using lookup field(s) instead of sub group by.
9.
Sub Group By is an extra field used to do group by together with the main Group By field.
10.
This is to tell where the Sub Group By field going to display. It could be on the left or right hand side of the main Group By field.
11.
In the situation Salesforce not allowed the field to perform a group by, Force group by option will bring necessary data into Report Upgrade
server then perform a group by function there instead of doing group by on SOQL level. This field has big performance impact should only
be selected when an Administrator knows this certain field can’t be group by in SOQL query.
12.
The field to tell goal measure to group by on when goal is used as a comparison measure.
13.
Choose an ID field to send when this Group By is used as an interaction selector. This ID field will replace the main Group By to send out
information for other component to interact with including Hyperlink component.
14.
Custom sort the values of this Group By field. The data will be sorting in the custom order when displaying on a component.
15.
Custom color the values of this Group By field. The data will be colored in the custom color on Chart component.
16.
Group By Bucket. Put different values into a certain bucket to reduce the number of values for displaying.
Group By
A Group By field have many different options for both displaying purpose or data join purpose.
1
1.
The name for this specific Group By field.
2.
The source object of the source field.
3.
The source field to group by on.
4.
Remote Group By is used when a Group By field is in another source object and needs to join this group by field to it. Remote Object is the
source object this Group By field will join to.
5.
Remote Join Field is the field on the remote object for this Group By to join data to.
6.
Remote Display Field is the field used for value displaying after data join between this Group By and Remote Field.
7.
Extra field(s) to display before this Group By field. It’s a simple lookup from Group By field to the source object for these extra field(s). If the
Group By field has multiple values from a lookup field, the first value will be selected. Report Upgrade Administrator needs to be aware of
the implication of using lookup field(s) instead of sub group by.
8.
Extra field(s) to display after this Group By field. It’s a simple lookup from Group By field to the source object for these extra field(s). If the
Group By field has multiple values from a lookup field, the first value will be selected. Report Upgrade Administrator needs to be aware of
the implication of using lookup field(s) instead of sub group by.
9.
Sub Group By is an extra field used to do group by together with the main Group By field.
10.
This is to tell where the Sub Group By field going to display. It could be on the left or right hand side of the main Group By field.
11.
In the situation Salesforce not allowed the field to perform a group by, Force group by option will bring necessary data into Report Upgrade
server then perform a group by function there instead of doing group by on SOQL level. This field has big performance impact should only
be selected when an Administrator knows this certain field can’t be group by in SOQL query.
12.
The field to tell goal measure to group by on when goal is used as a comparison measure.
13.
Choose an ID field to send when this Group By is used as an interaction selector. This ID field will replace the main Group By to send out
information for other component to interact with including Hyperlink component.
14.
Custom sort the values of this Group By field. The data will be sorting in the custom order when displaying on a component.
15.
Custom color the values of this Group By field. The data will be colored in the custom color on Chart component.
16.
Group By Bucket. Put different values into a certain bucket to reduce the number of values for displaying.
Group By
A Group By field have many different options for both displaying purpose or data join purpose.
1
 2
2
 3
3
 4
4
 5
5
 6
6
 7
7
 8
8
 9
9
 10
10
 12
12
 13
13
 14
14
 15
16
15
16
 11
11
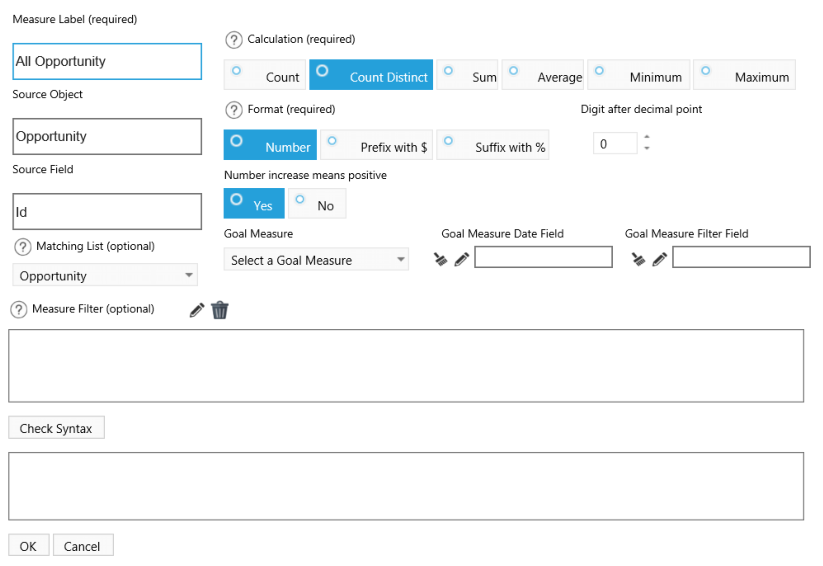
 Measure
1.
An unique name for this Measure.
2.
Source Object of this Measure.
3.
Source Field of this Measure.
4.
List to display when this Measure is used in a selector for interaction. For example, Sales Amount Measure will have a matching list
defined to display opportunity list for close-won opportunities.
5.
Pre-defined Filter for this Measure.
6.
How this Measure should be calculated.
7.
Format of the Measure.
8.
Digit(s) to display after decimal point.
9.
Number increase means positive. For example, Sales amount increase means positive. Lost Opportunity increase means negative.
10.
Goal Measure for this Measure to compare to.
11.
Goal Measure field to apply filter on when interacting with other components.
1
Measure
1.
An unique name for this Measure.
2.
Source Object of this Measure.
3.
Source Field of this Measure.
4.
List to display when this Measure is used in a selector for interaction. For example, Sales Amount Measure will have a matching list
defined to display opportunity list for close-won opportunities.
5.
Pre-defined Filter for this Measure.
6.
How this Measure should be calculated.
7.
Format of the Measure.
8.
Digit(s) to display after decimal point.
9.
Number increase means positive. For example, Sales amount increase means positive. Lost Opportunity increase means negative.
10.
Goal Measure for this Measure to compare to.
11.
Goal Measure field to apply filter on when interacting with other components.
1
 2
3
2
3
 6
6
 7
7
 9
9
 8
8
 10
10
 11
12
4
11
12
4
 5
5
