|
<< Click to Display Table of Contents >> Report Scheduler |
  
|
|
<< Click to Display Table of Contents >> Report Scheduler |
|
The Report Scheduler is where you manage your report delivery schedule including the report you want to send, the delivery schedule, recipient list, and/or email contents.
Manage Your Report Delivery Schedule
To manage your data source connections, go to the menu bar on the left side and select Manage Source Connections.
Schedule and Report
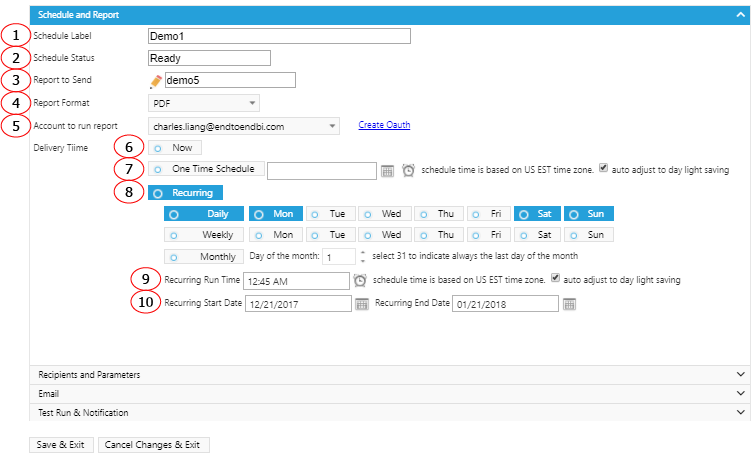
1. A descriptive name for the schedule.
2. Schedule status, including Ready (active), Disabled, or Retired. Status is not showing when creating a new schedule like the example above.
3. Report being sent in the schedule.
4. Attached document format in the email.
5. Salesforce account used to generate a report.
6. Send report right away.
7. Schedule a one-time report run.
8. Select a frequency to send out the report - Daily, Weekly or Monthly. In the case of multiple times in a month, each month day needs to have its own schedule.
9. The time in a day to run the report.
10. Date to start the recurring schedule.
11. Date to end the recurring schedule.
Recipients and Parameters
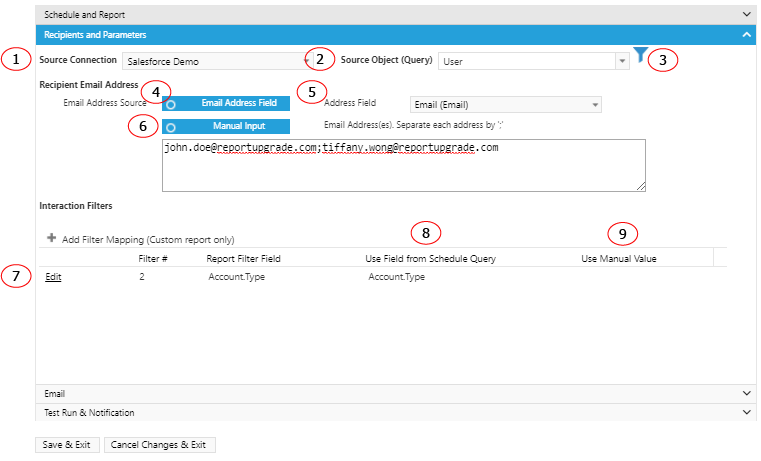
1. You can select a data source, object and field to be used for recipient email address. For example, a list of users from User object in Salesforce. Select data source connection just like in Measure or List selection.
2. Source object or query of the recipients.
3. Add a filter(s) to limit the list of recipients.
4. Specify recipient email address will come from a field in the query.
5. The field for the email address.
6. Manual put in the recipient’s email address. This option could work with From Email Address Field the same time. Means you can manually add email addresses to the email addresses from the query.
7. Each filter exists in the selected report will show up here if it has an interaction variable in it. Means if a filter is used for interaction purpose, it will show up here. This is to provide a way to dynamically apply interaction filters in the selected report when performing the report delivery. Each interaction variable could be replaced by a field from the query (8) or manually input a value to it (9).
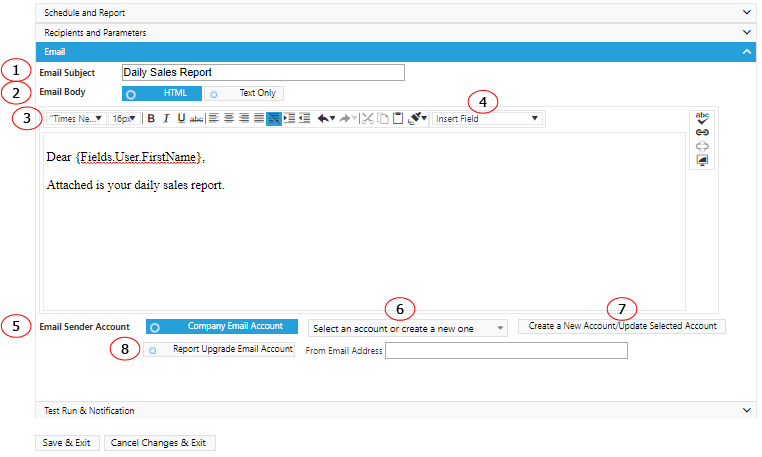
1. You can manually put in the subject of the email or merge a field value from the query in Recipients option.
2. Select to send email in HTML format or text format.
3. Formatting option when sending email in HTML format.
4. A list of available fields to embedded into the email body or subject from selected object/field.
5. Use email account from your company or use Report Upgrade email delivery account. The sender will be different when the recipient sees the email. One is from your company’s email account and the other (6) is from reportdelivery@reportupgrade.com (8).
6. Select an existing company email account to send emails.
7. Create a new company email account for sending emails.
Test Run
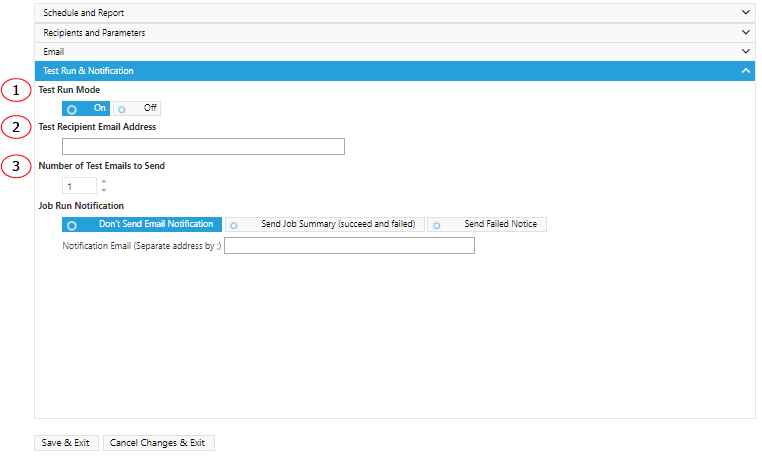
1. Turn on the test mode to send email to test email address.
2. The test email address to send a report to.
3. The number of emails to send. This is used when a report is customized based on the user profile. Since each user will receive a different report. Test more than one email to see if reports are customized to the individual user. Each email will include different report based on user profile but will be sent to the same test email account.