Getting Started with Report Upgrade
 Tool Bar
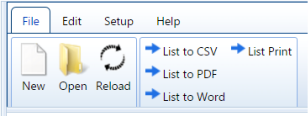
The Tool Bar is located at the top of the Dashboard and appears like this:
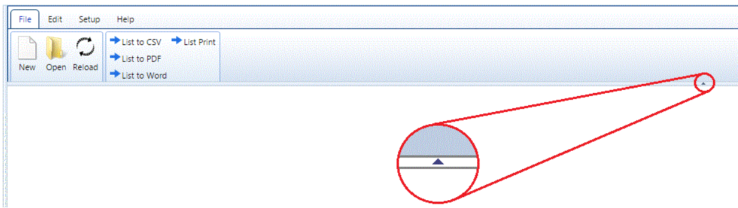
Notice there is a small grey triangle located in the middle of the Tool bar. If you click on this, the
Tool bar will be hidden from view, giving you more space to view your dashboard.
Edit Tab
The Edit tab is where you will find all of the available component options. Underneath the Edit button you will find tabs to Run, Save, Save
As, Options and Delete. The Run button is used after saving your dashboard edits to exit out of Edit mode and run the dashboard. There
are also the Save and Save As buttons, which will save your current dashboard or save a copy of the current dashboard under a new name.
Once you have selected, dragged and dropped a component on the dashboard, use the Options button to edit the component. The Delete
button will delete the selected component from your dashboard. For detailed descriptions of each component, see ‘What are the Different
Components?’
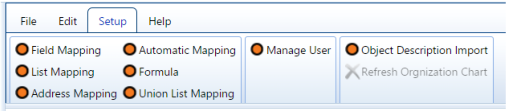
Setup Tab
The Setup tab is where you will find all of your Mapping windows: Field Mapping, List Mapping, Address Mapping, Automatic Mapping,
Formula and Union List Mapping. Click on each link above for detailed instructions. The Manage User button is where you will manage the
access of each Report Upgrade User. A more detailed description can be found here.
The Object Description Import is a function where you can manually import an object from your Salesforce org. This is used if there has
been an update to an object in your Salesforce org and that change needs to be reflected in Report Upgrade. For example, if a new field is
added to an object in Salesforce, that field will need to be imported to Report Upgrade.
Help Tab
The User Guide and Frequently Asked Questions (FAQs) are both found in the Help tab. Also found in the Help tab are Video Tutorials that
will walk you through each step of the dashboard building process and a link to the company website.
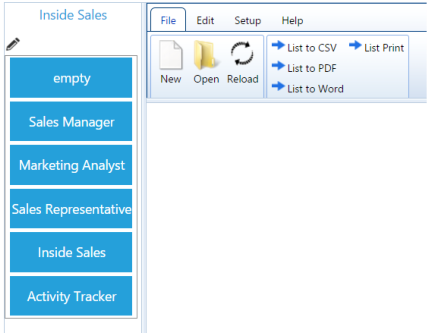
Using the Bookmarks Bar
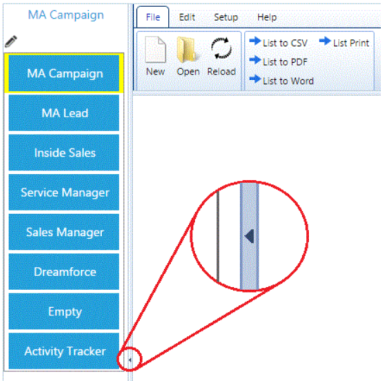
To open your Bookmarks Bar, click on the small grey triangle on the left side of your dashboard.
The Bookmarks Bar will pop out to become visible. To hide the Bookmarks Bar simply click the same triangle. The Bookmarks Bar works
much like a bookmarks bar in your web browser. Select any Bookmark from the bar to go directly to that dashboard.
How Do I Create a Bookmark?
To create a Bookmark, go to your Public or Personal Dashboard folders and select the dashboard you want to Bookmark. Right click on the
dashboard and select Create Bookmark.
You will see that the dashboard is added to your Bookmarks Bar once the page reloads.
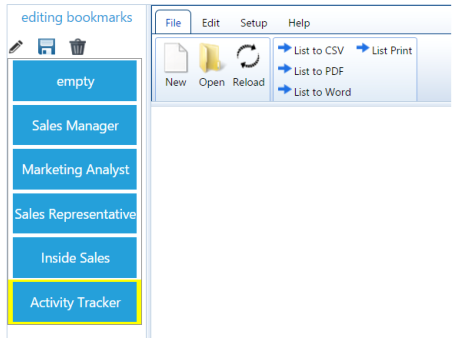
To modify the Bookmarks Bar, click on the Pencil Icon at the top of the Bar.
You can now customize the Bookmarks to reorder or delete any Bookmarks you don’t want and then save changes. To move a Bookmark
simply select the Bookmark and drag and drop it into the line-up where you want it.
Once in place, click the Save button and the Pencil Icon again to close Edit mode.
Tool Bar
The Tool Bar is located at the top of the Dashboard and appears like this:
Notice there is a small grey triangle located in the middle of the Tool bar. If you click on this, the
Tool bar will be hidden from view, giving you more space to view your dashboard.
Edit Tab
The Edit tab is where you will find all of the available component options. Underneath the Edit button you will find tabs to Run, Save, Save
As, Options and Delete. The Run button is used after saving your dashboard edits to exit out of Edit mode and run the dashboard. There
are also the Save and Save As buttons, which will save your current dashboard or save a copy of the current dashboard under a new name.
Once you have selected, dragged and dropped a component on the dashboard, use the Options button to edit the component. The Delete
button will delete the selected component from your dashboard. For detailed descriptions of each component, see ‘What are the Different
Components?’
Setup Tab
The Setup tab is where you will find all of your Mapping windows: Field Mapping, List Mapping, Address Mapping, Automatic Mapping,
Formula and Union List Mapping. Click on each link above for detailed instructions. The Manage User button is where you will manage the
access of each Report Upgrade User. A more detailed description can be found here.
The Object Description Import is a function where you can manually import an object from your Salesforce org. This is used if there has
been an update to an object in your Salesforce org and that change needs to be reflected in Report Upgrade. For example, if a new field is
added to an object in Salesforce, that field will need to be imported to Report Upgrade.
Help Tab
The User Guide and Frequently Asked Questions (FAQs) are both found in the Help tab. Also found in the Help tab are Video Tutorials that
will walk you through each step of the dashboard building process and a link to the company website.
Using the Bookmarks Bar
To open your Bookmarks Bar, click on the small grey triangle on the left side of your dashboard.
The Bookmarks Bar will pop out to become visible. To hide the Bookmarks Bar simply click the same triangle. The Bookmarks Bar works
much like a bookmarks bar in your web browser. Select any Bookmark from the bar to go directly to that dashboard.
How Do I Create a Bookmark?
To create a Bookmark, go to your Public or Personal Dashboard folders and select the dashboard you want to Bookmark. Right click on the
dashboard and select Create Bookmark.
You will see that the dashboard is added to your Bookmarks Bar once the page reloads.
To modify the Bookmarks Bar, click on the Pencil Icon at the top of the Bar.
You can now customize the Bookmarks to reorder or delete any Bookmarks you don’t want and then save changes. To move a Bookmark
simply select the Bookmark and drag and drop it into the line-up where you want it.
Once in place, click the Save button and the Pencil Icon again to close Edit mode.


 Setting up Your Folders
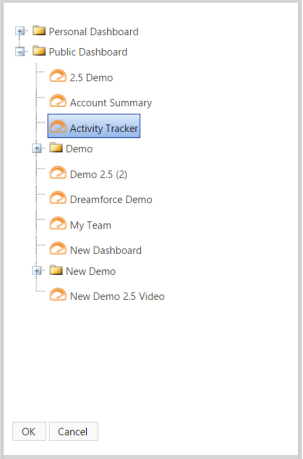
To find a saved and stored dashboard, go to the File tab on your top tool bar and click on the Open button.
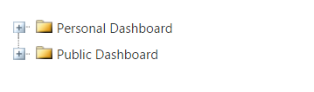
Once selected, a pop-up will appear that shows two main folders: Personal Dashboards and Public Dashboards. To expand each
folder, select the small plus sign next to each.
The Public Dashboard folder contains dashboards that are shared with all of the Report Upgrade users in your organization. The
Personal Dashboard folder contains dashboards that only you have access to.
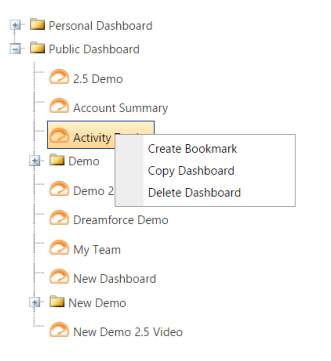
You can create a Bookmark, copy a dashboard or delete a dashboard by selecting the dashboard name and right-clicking to display a
pop-up window.
Once you have located the dashboard you want to open, select it and click OK.
Setting up Your Folders
To find a saved and stored dashboard, go to the File tab on your top tool bar and click on the Open button.
Once selected, a pop-up will appear that shows two main folders: Personal Dashboards and Public Dashboards. To expand each
folder, select the small plus sign next to each.
The Public Dashboard folder contains dashboards that are shared with all of the Report Upgrade users in your organization. The
Personal Dashboard folder contains dashboards that only you have access to.
You can create a Bookmark, copy a dashboard or delete a dashboard by selecting the dashboard name and right-clicking to display a
pop-up window.
Once you have located the dashboard you want to open, select it and click OK.


Tool Bar
The Tool Bar is located at the top of the Dashboard and appears like this:
Notice there is a small grey triangle located in the middle of the Tool bar. If you click on this, the
Tool bar will be hidden from view, giving you more space to view your dashboard.
Edit Tab
The Edit tab is where you will find all of the available component options. Underneath the Edit button you will find tabs to Run, Save, Save
As, Options and Delete. The Run button is used after saving your dashboard edits to exit out of Edit mode and run the dashboard. There
are also the Save and Save As buttons, which will save your current dashboard or save a copy of the current dashboard under a new name.
Once you have selected, dragged and dropped a component on the dashboard, use the Options button to edit the component. The Delete
button will delete the selected component from your dashboard. For detailed descriptions of each component, see ‘What are the Different
Components?’
Setup Tab
The Setup tab is where you will find all of your Mapping windows: Field Mapping, List Mapping, Address Mapping, Automatic Mapping,
Formula and Union List Mapping. Click on each link above for detailed instructions. The Manage User button is where you will manage the
access of each Report Upgrade User. A more detailed description can be found here.
The Object Description Import is a function where you can manually import an object from your Salesforce org. This is used if there has
been an update to an object in your Salesforce org and that change needs to be reflected in Report Upgrade. For example, if a new field is
added to an object in Salesforce, that field will need to be imported to Report Upgrade.
Help Tab
The User Guide and Frequently Asked Questions (FAQs) are both found in the Help tab. Also found in the Help tab are Video Tutorials that
will walk you through each step of the dashboard building process and a link to the company website.
Using the Bookmarks Bar
To open your Bookmarks Bar, click on the small grey triangle on the left side of your dashboard.
The Bookmarks Bar will pop out to become visible. To hide the Bookmarks Bar simply click the same triangle. The Bookmarks Bar works
much like a bookmarks bar in your web browser. Select any Bookmark from the bar to go directly to that dashboard.
How Do I Create a Bookmark?
To create a Bookmark, go to your Public or Personal Dashboard folders and select the dashboard you want to Bookmark. Right click on the
dashboard and select Create Bookmark.
You will see that the dashboard is added to your Bookmarks Bar once the page reloads.
To modify the Bookmarks Bar, click on the Pencil Icon at the top of the Bar.
You can now customize the Bookmarks to reorder or delete any Bookmarks you don’t want and then save changes. To move a Bookmark
simply select the Bookmark and drag and drop it into the line-up where you want it.
Once in place, click the Save button and the Pencil Icon again to close Edit mode.
Setting up Your Folders
To find a saved and stored dashboard, go to the File tab on your top tool bar and click on the Open button.
Once selected, a pop-up will appear that shows two main folders: Personal Dashboards and Public Dashboards. To expand each
folder, select the small plus sign next to each.
The Public Dashboard folder contains dashboards that are shared with all of the Report Upgrade users in your organization. The
Personal Dashboard folder contains dashboards that only you have access to.
You can create a Bookmark, copy a dashboard or delete a dashboard by selecting the dashboard name and right-clicking to display a
pop-up window.
Once you have located the dashboard you want to open, select it and click OK.
